Selasa, 21 Februari 2012

Bargains of The Week

I did my part of my weekly grocery shopping today and found some great bargains at the Grocery Outlet to pass along to my local readers.  After reading this post by Robb Wolf (I apologize for the language),  we have added some rice back into our diet successfully.  Which is why you see the Rice crackers listed on here, it's really a personal choice.   After some research and the discovery that I do better on more carbs, we are adding a sprinkling of Rice back in.  The children eat more rice in the form of crackers and rice cakes than my husband or I, for us it is infrequent.  The biggest thing if you are interested in trying it is to look for signs you may be reacting, such as congestion, sneezing etc. upon consuming it. And you will also need to weigh whether you are someone who needs to stay with lower Carbs, it's not for everyone, just like low Carb Paleo is not for everyone.  I love Chris Kresser's work on this subject if you get a chance please visit his page.  
When I post items on here I ask that you please read the labels for yourself, there may be some things I make concessions on that you may not.  It's always good practice to read all of your labels so you are aware of any hidden ingredients anyway.  Happy Shopping!


Rice Crackers


"Popped" Apple chips, equal to 1 apple per package, contains 5 packages.


While not organic, there is no sugar added just plain applesauce.


This is my most exciting find!  My favorite brand of dark chocolate, as always please read the label and make the decision for yourself.


I buy this applesauce for the kids at Costco.  It works out to about $1.67 per package, but it is Organic.

Sabtu, 18 Februari 2012

The Importance Of Epsom Salt Baths

I'm sorry I haven't made it on here to do a post recently.  I have been having an extra busy time recently and the blog has had to take a bit of a back seat.  I was involved in a minor vehicle accident about 1 1/2 weeks ago and have just not been myself, exhaustion and pain pretty describe how I've been feeling.  My daughter and I are "okay", but are suffering from whip lash type symptoms, that along with some seatbelt soreness.  Anyway, it has been a real set back for me and as I have struggled to grasp and accept it this week, it has caused me to do some reflecting.   First of all is gratitude, I am so thankful that the Lord watches over and keeps us each day.  My husband has been in the fire service for the past 23 years which has made us very aware of just how fragile life is, and how it really is not in our control.  The Lord knows the number of our days, and we just get to live them out to His glory,  be grateful and consider each day a gift, this was a great reminder of that for me.  Second, life isn't fair!  I was not at fault in the accident, yet that doesn't matter, we still got hit and we still have to deal with it!  I could sit in the corner and cry or pout about it, or move on.  And trust me I have done my share of crying about it, but then it's time to move on, I have a family that still needs me and a life that doesn't stop.  One of my biggest complaints  is that I was just getting back in CrossFit shape after battling Adrenal Fatigue and a long back injury.  Between the two I was unable to work out for nearly 4 months, and just started working out more seriously again in January.  The last 3 weeks I had started seeing some leaps, getting back in CrossFit shape is hard work.   Anyway, all that to say, what I am going to do about it?  I can't change the circumstances and once again I am feeling out of control, and driven to cling to the one solid thing I have to cling to, the one thing that I know can give me life.  It has made me cry out to the Lord, shaking my fist at him, thanking and praising Him, petitioning for health and much more. So for now I will be faithful to do what I can to help myself heal, eat well, rest lots, exercise when I am released to do so, but most of all I will rest in His peace and just except the life I've been given.  I'm really so much happier when I'm not a victim of my circumstances, and when I remember I have neighbors who need me (especially my immediate neighbors, my family).  I don't want to be so wrapped up in myself that I don't have time to see the blessings around me, to see and serve my husband, children and friends.  Granted my serving may just be sitting and reading a book to the little ones, but by serving I mean making them a priority.   I'm not talking about being "super" mom and doing, but being in the here and now.  And thankfully when I fail in all that I can get forgiven and just start over, that is such good news!  


One of the practical things I have been doing during this time is continuing to take my Epsom Salt baths.  This is something I have been intending to blog about and have done research to write a more science based piece on.  However, I feel it is so beneficial that I am going to just throw the idea out there for now and hopefully later I can get to writing that piece for you all.  
I discovered Epsom Salt baths this fall, and fell in love with them immediately! I mean who doesn't love a little shut the door, mommy quiet time!   A couple of times a week I put all the younger kids to bed and then about half an hour before I intend to go to bed, I take an Epsom Salt bath. Since I have digestive issues and have to limit my oral consumption of Magnesium, this is a great way to get more magnesium (something most of us in America are deficient in).  The Epsom salt promotes better sleep, and if you take it in a darkened room (I use a lavender scented candle), that will also help prepare your body for sleep.  Not only does the Epsom Salt help with your magnesium levels it is also a great way to detox your body, reduce stress and help achy/sore muscles.  Many a time I put my aching/sore body in there and got out feeling so much better!  


Here is the simple run down of how to do it.  

  1.  You want your bath water as hot as you can, this is important as it opens your pores for better absorption and also makes you sweat which helps detoxify your body.  
  2. While your tub is filling with hot water, add 2 cups of Epsom Salts and if you are focussing on detox you can take it up a notch by adding 1 cup of baking soda also.  Sometimes I add baking soda and sometimes I just skip that step.  
  3. Then sit back, relax and enjoy some peace and quiet for 10-15 minutes.  I like to use this time for my prayer time, which is another added benefit for me, it's hard to squeeze in some quiet time for prayer when you have a houseful of people.  I also like to drink a cup of Yogi Bedtime tea while I am sitting there soaking, I have found it to be very helpful and relaxing.  My Epsom Salt bath time has become so therapeutic for me that even my husband has noticed the difference, and I think he loves knowing that I am in there praying for him and our family too.  If you would like more information on the subject of Epsom Salt Baths, a quick Google search should yield some great information.  


I have found Costco to be 
the best deal locally 
for Epsom Salt, 
3 four pound bags for a great price.

I also buy my baking soda in a large bag from Costco.


I also suggest purchasing a 1 cup measuring cup from a thrift store or dollar store.  It is much more convenient to just leave the measuring cup in the bag, then you don't have to look for one every time you want to take a bath.  I like to keep everything I need together, matches, candle, measuring cup, epsom salt and baking soda.  


Sabtu, 11 Februari 2012

Bacon and Onion Pork Chops

My mom used to make pork chops this way when I was growing up (without the bacon though) and would make the broth into gravy afterwards.  I remember really enjoying it, and recently thought why not take it up a notch with the bacon, the end result in the words of my husband "out of this world!".  So with that I bring you Bacon and Onion Pork chops.


BACON AND ONION PORK CHOPS


4-6 small pork chops
1 yellow onion, sliced
1 cup chopped bacon ends or bacon
sea salt and pepper


In a large skillet or frying pan cook your bacon ends until nicely browned and crispy, remove and set aside, leaving the grease to brown your pork chops in.  Pat dry your pork chops and add them to the pan, add a generous amount of sea salt and some pepper and brown on each side over high heat (usually takes a few minutes).  Then turn heat to low and add the sliced onion and about 2 cups of water ( what you want is enough water to be even with the pork chops). Make sure all the onions are in the liquid so they can cook well, you may want to check the onions part way through the cook time and move them around a bit so they are sure to be done.  Cover and bring to a boil, then reduce heat to low and simmer for about 20-25 minutes depending on the thickness of your pork chops.  The lower and slower the better, makes for tender pork chops.  Serve with the onions, and some of the pan juices and then top with bacon crumbles.  Very simple, quick, easy and a huge hit!  Hope you enjoy it as much as we have.  
Chopping Bacon Ends

Just 5 ingredients and water!

Pork Chops nicely browned

Browned and topped with onions

Ready to eat with some grilled zucchini and sugar snap peas.

Jumat, 10 Februari 2012

Beef (or chicken) Enchilada Recipe


I stumbled upon this recipe for Echilada sauce through Facebook a couple of weeks ago.   It came highly recommended and once I made it and tasted it I understood why!  It was a huge hit with everyone in our family, I actually made two different Enchilada sauces on the same night so we could do a taste test.  One of the recipes was very time consuming, which for me would put it in the special occasions category, I do not have much time so quick, easy and few ingredients are my motto.  I was very relieved when the results from our little family taste test came in and guess what?  The Easy Enchilada Sauce was by far the tastiest! We all loved it and I think you will too, in fact I would double it just to have extra around for eggs, topping Spanish Cauliflower "Rice", chicken, etc.   All credit goes to Healthy Living How To for this wonderful sauce, I have made a few very minor changes, like adding more beef broth and omitting the olive oil.  For her complete Recipe please visit here. 


There are two options as far as what to wrap it in, you can wrap it in cabbage leaves or make a batch of my Crepes which work great as coconut flour "tortillas".  They are really yummy in the enchiladas, but are more work, so you may want to make them ahead and refrigerate them.  I usually make my crepes really small in a small pan, so I would make them bigger for these.


Enchilada Sauce


2- 6 ounce cans tomato paste
2 1/2 cups beef broth
1 tsp cumin
1 tsp organo
4 TBSP chili powder (for a spicier sauce substitute some hot chili powder)
1 tsp sea salt


In  medium saucepan, combine all the above ingredients.  A whisk, works well to incorporate it.  Then over medium high heat bring to a boil and then turn down to low and simmer for about an hour to really deepen the flavors.


Beef Enchiladas 


2 small onions chopped
Crepe/"Tortilla" Enchiladas
1 diced pablano pepper
2 pounds ground beef
2 cloves garlic minced
1 cup Enchilada sauce
1 tsp cumin
1 tsp chili powder
salt and pepper to taste
1 large head of cabbage and/or crepes/"tortillas"


Garnishes:                                           
red onion
avacado
cheese ( if you do dairy)


In a large skillet brown your ground beef, onion, pablano, garlic, salt and pepper.  Cook until your ground beef is nicely browned and the onions are softened.  You may need to drain off some of the fat at this point depending on the fat content of your meat.  Then add 1 cup of Enchilada sauce, cumin and chili pepper and simmer on low.  
If you are using cabbage leaves, now would be the time to start a large pot of water boiling and preheat your oven to 350 degrees.  Core and peel the cabbage leaves carefully.  Once the water comes to a boil, add the leaves and remove from heat, let them sit for 10- 15 minutes and then remove one at a time to a clean dry towel and dab dry.  Then fill with some meat filling and fold/roll up.  Before placing it in a large glass pan place a small amount of the enchilada sauce in the bottom of the pan.  Then place the rolled enchiladas on in the pan and repeat the process until it's done, sometimes it takes me more than one pan to fit them all.  Then top them with addition Enchilada sauce, if you do dairy now would be the time to add some cheese before you place it in the oven.  Bake at 350 degrees, for 25 minutes.
Serve with your choice of garnishes and enjoy!  We love to have it with some Spanish Cauliflower "Rice" topped with Enchilada sauce.


Cabbage Leaf Enchiladas with Spanish Cauliflower "Rice"

Minggu, 05 Februari 2012

What Is Kombucha and what do I need to start making my own?

This is PART I, in what will be a series of posts on Kombucha.

Kombucha is an effervescent, fermented tea which is full of antioxidants and live bacteria.  Kombucha has many alleged health benefits (there hasn't been enough research to substantiate), for myself I have noticed increased energy, improved digestion and I feel it also helps with my immune system.  When I run out (which happens occasionally) is when I really notice the difference it makes.
KOMBUCHA:
  • increases energy
  • aids digestion
  • helps with constipation
  • Probiotic, helps fight overgrowth of Candida 
  • helps detox the liver
  • high in antioxidants
  • glucosamines aides in joint recovery
  • Alkalizes the body
  • Boosts your immune system
  • contains B vitamins
There are 4 necessary components needed in making Kombucha, tea (Black, Green or Oolong), sugar (regular white sugar or organic sugar, NO honey or other substitutes), water, and a SCOBY.  


A Healthy Scoby
What is a SCOBY?  SCOBY stands for Symbiotic Colony Of Bacteria and Yeast and is the essential ingredient for fermentation.   The SCOBY is what gives the Kombucha it's healthy bacteria.  It actually eats the sugar in the fermentation process, which is why you never want to let your Kombucha ferment longer than 4 weeks.  If it goes past 4 weeks the SCOBY will run out of sugar and your SCOBY will become unhealthy.  A typical fermentation is about 10-14 days and can then be bottled.


If Kobucha is new to you I suggest purchasing some from from your local Natural Food Store and trying it first.  It's best to start out slow, about 1 cup a day for the first week, allowing your body to detox and adjust.  Then you can increase your consumption.  I will caution that the store bought Kombucha does contain caffeine, so drinking it in the morning would be best.  I make mine decaffeinated at home so we can drink it at any time of the day and so the kids can enjoy it too.  The brand I suggest is Synergy and the flavors I like best are, Cosmic Cranberry, Gingerberry or Strawberry Serenity.  One reason I suggest trying it first, is some people will love the taste and find it very refreshing (like me), others however, will not.  It actually was not love at first taste for me.  The first time I tried it I really didn't care for it, then a few months later I tried it again and loved it!


So...now that you've tried Kombucha and like it, what do you need to start making your own at home?
  • 1 or 2 gallon glass open mouth jar ( I like these jars from Target )
  • Black, Green, or Oonlong tea bags (my preference is black tea)
  • SCOBY (from a friend or from Cultures for Health online)
  • Sugar (either white or organic)
  • 2-4 cups starter tea or Apple Cider Vinegar
  • Clean t-shirt or other loose knit fabric to cover the jar with
  • Large rubber band to hold the fabric in place
  • Plastic or wooden spoon for stirring


Anchor Hertitage Glass Jar 1 gallon ($7.87) or 2 Gallon ($14.19) 


Tea Bags


A healthy SCOBY from a friend or from here.


Organic or regular white granulated sugar


2-4 cups of starter Kombucha or Apple Cider vinegar


small piece of clean t-shirt material or other loose weave fabric.


Large rubber bands


Wooden spoon for stirring 
Sometime before the first fermentation process is over you will need to gather the following:

  • 4-8 (30-34 Oz) flip top bottles (depending on whether you use the 1 or 2 gallon)
  • small mouth plastic funnel for filling the bottles
  • Cheesecloth 
  • glass measuring cup or plastic ladle
  • fruit juice, or fresh fruit and fresh ginger if you like
Here is the type of flip top bottles I suggest, these were at Costco this winter, but the health food store and the Grocery outlet have similar ones.  Or you can order empty bottles online.


Bottles with yummy Contents, works out to about $2.50 per bottle.


Selasa, 31 Januari 2012

Oh How I LOVE Kombucha!

I started making my own Kombucha a few months ago, after my husband and I fell in love with it's taste.  However, it was so expensive in stores that it was a once or twice a week treat.  We would buy them for each other as little "I love you's".  That was until a friend of mine offered me one of her "mothers/SCOBY's" and then I was hooked.  I actually have two 2.5 gallon containers and a 1 gallon container going all the time now because we all enjoy drinking it and now we can!  Making Kombucha at home is not only easy but very cost effective, a single 2 gallon batch costs me much less than one little bottle from the health food store (around here they sell for about $3.00).  And being fermented it does wonders for gut health as well as being touted as being high in B vitamins.  My kids ask for it and I am so happy to be able to freely give them something so good for their little (and big) bodies.  
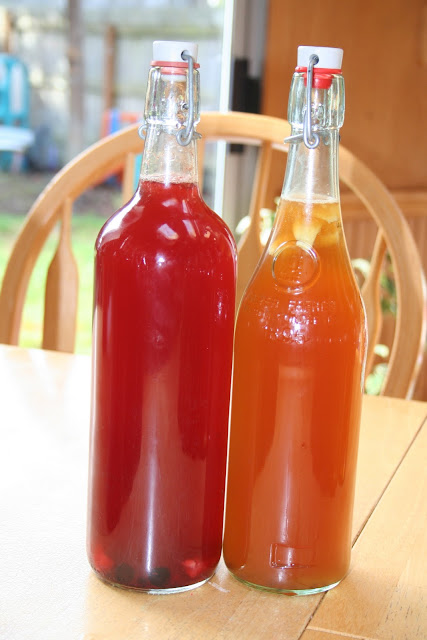
My favorite is to stuff some thawed, mashed frozen blueberries in the bottom of the bottle and then some fresh  ginger, mmm...so refreshing and tasty. Or our other favorite is unsweetened cranberry juice and fresh ginger.  Using juice is very economical and budget friendly since you only use 1/4 cup per bottle.  Another money saver I discovered is buying bottled sparkling juices in the flip top bottles, letting the kids drink the contents and then soaking off the labels and reusing them.  I found the bottles to be much cheaper that way ( and I'm paying for more than a bottle).  I can get really large bottles that way and for around $2.00 a bottle I now have some nice 34 ounce bottles.  
My children also enjoy "helping" me to bottle the Kombucha for the second ferment and look forward impatiently to when they can drink it!

 One of my 2.5 gallon Jars.
 My little one gallon jar.
 Supplies to bottle the Kombucha.
 My little 4 year "helper".
 My helper showing a finished bottle ready for the second ferment.
 Kombucha from one 2.5 gallon and the 1 gallon.
 Blueberry Ginger and Apple Ginger Kombucha.
 Apple Ginger Kombucha ready for the second ferment, so pretty!
Blueberry Ginger Kombucha ready for second ferment.

Minggu, 29 Januari 2012

Pecan Baked Dates


This is another repost of an "invisible" post I made for Thanksgiving.

Baked Dates

This recipe is quick and easy and is for those of you looking for alternative to baking pies.  They are super yummy with the carmelized date and roasted pecan.  You could even add a little cinnamon if you like.

Ingredients:
fresh dates, pits removed
unroasted pecans
coconut oil

Preheat your oven to 350 degrees.  Grease a 8x8 pan.  Slice into your dates lenghtwise, being careful not to slice all the way through.  Then place a whole pecan in the slit you made and place it in your prepared pan. When your pan is full or you have made the amount you need place the pan in the oven and bake for about 10 minutes.  Again it depends on your oven.  It may take a little longer, what you are looking for is for the dates to carmelize a bit and the pecan to get a little toasted.  Cool slightly and enjoy!  This are a yummy treat just be careful you don't eat to many!